How to make an unnecessarily fluffy wig (adding volume)
http://otakitty.blogspot.com/2016/09/how-to-make-unnecessarily-fluffy-wig.html
Oh, anime hair. Not only did anime producers decide that any color in the gamut is fair game to put on someone's head, they also like to add extra flair with some gravity-defying hairstyles, which in most cases requires massive hair volume to pull off.
One of the reasons why it's so important to buy your wigs from specialty cosplay wig shops, is that these retailers not only have a full range of colors that better capture the most popular hair shades in anime, but the wigs will usually have a decent amount of volume to them (my favorite retailer is Arda Wigs). Even considering this, you'll find that most cosplayers that take their wig-game to a pro level, are combining two or three wigs to achieved the desired volume.
Well then, the day came that I decided to cosplay Mimori Kishida from AKB0048 and I got hung up on just how incredibly fluffy and thick her hair is! I mean, look at it! It's outta hand!
 |
| luscious |
 |
| fluffy |
 |
| volume-tastic! |
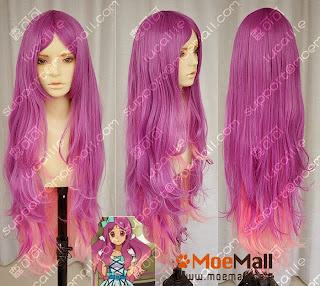
Seeing what was out there already, I decided to go with a wig from MoeMall, because it was already a very close match for the style and color. Seeing other cosplayers that also wore this wig, I felt that it just didn't have that luscious oomph to it, so I decided to go ahead and fluff it up.
- Step one: decide what's going to give it volume.
I've seen some tutorials that recommend teasing the hair to create volume, but it seriously freaks me out to destroy the wig with a technique that is essentially TANGLING the hair. I wanted to be able to undo my work in case I wanted to re-use the wig for other purposes.
I chose to use these ballerina bun hair donuts (I don't know what the hell else to call them), because they were pretty cheap and had a good texture. It's like little nylon coils with a some stretch to them. - Prepare the area that needs volume. In my case, I had to part the front part of the wig from most of the back part that was going to have the volume added. Use large hair clips and pins to gently hold the hair in place.

I'm using a scrap piece of fabric to separate the layers. - Attach the texture layer by layer. I had already determined the layers where I would be adding extra, using as a guide the weft strands of the wig.

I pinned the texture in place (using a styrofoam wig head), above the weft. 
Sew the texture along the weft with a thread color that matches.

Keep adding the texture layer by layer (I started from the top and finished at the bottom).

That's all the layers! - Match the texture to the wig color. Although most of the additional texture should be hidden, I went ahead and used some sharpie+alcohol (wig dye formula) to spray the texture and make it match the color of the wig.
- Style the wig. This is the part where I created the extra lump hump.

I added a few lose stitches in the middle just to keep the hairs from spilling out of place. 
I'm going to attach a piece of lace at the bottom so it's easier for me to fold over the hair and sew it to the bottom of the wig cap. 
The lace, and the hair. 
Just run it under the sewing machine! 
With the reinforced bottom, I can attach it to the bottom of the wig cap. 
Fold it over and voilá, looking pretty dam bulbous! 
I curled the bottom with plastic rollers and low heat since the wig got too straightened out. - Add the accessories. Mimori wears a ridiculous piece of frill that just magically sits on her head, I couldn't find the logic to it, but assumed it was some sort of wrap around band.

Pinning the frilly bit. 
Tying it up at the back. - Done! This is a photo that best showcases how bulbous it is.
 |
| they're pretty easy to unroll, stretch and cut to size. |
(The heart halo is added in photoshop if you were wondering)
Although I think if I wear this cosplay again, I'll re-style the wig so it flows a little better.


.jpg)


.jpg)


Good job on the hair there! There might be an even bigger challenge with the hair of Tsumugi Inazuka from the recently ended "Sweetness & Lightning". There's something very Farrah Fawcett about her do.
ReplyDeletehttps://www.youtube.com/watch?v=i6YiJswibF4